Wednesday, June 30, 2010

Shrimp Fried Rice


A day before the fried rice, I made Thai shrimp curry (recipe will follow soon) and served with rice. I didn't even have a chance to take a picture of the shrimp curry before it was finished but I did have leftover rice and some extra frozen shrimp in the freezer. Thanks to Jaden Hair of Steamy Kitchen, we all enjoyed the leftover basmati rice and the shrimp again the next day without any feeling of monotony. I didn't add or alter Jaden's recipe, but for the sake of my own records I am repeating the recipe here. For the original post go to Steamy Kitchen.

I will use brown rice next time to make it even healthier, but I still don't feel bad, since I used basmati rice and it has a "medium" glycemic index (between 56 and 69),  as compared to certain other grains and products made from white flour. When you make use of the glycemic index to prepare healthy meals, it helps to keep your blood glucose levels under control.

Ingredients
8 ounces small raw shrimp, shelled and deveined
1/2 teaspoon kosher salt
freshly ground black pepper
1/2 teaspoon cornstarch
2 tablespoons cooking oil, divided
3 eggs, beaten
2 stalks green onion, minced
4 cups leftover rice, grains separated well
3/4 cup frozen peas and carrots, defrosted
1 tablespoon soy sauce (use gluten-free soy sauce if you are making a gluten-free version)
1 teaspoon sesame oil

Directions:

1. In a bowl, toss the shrimp with the salt, pepper and cornstarch. Let marinate for 10 minutes at room temperature. Heat a wok or large sauté pan on high heat. When the pan is hot enough for a bead of water to instantly sizzle and evaporate, add just 1 tablespoon of the cooking oil and swirl to coat pan.

2.  Add the shrimp, quickly spreading out around the cooking surface area so that they are not overlapping. Let fry, untouched for 30 seconds. Flip over and let the other side fry for 30 seconds, or until about 80% cooked through. Remove the shrimp from the pan onto a plate, leaving as much oil in the pan as possible.

3. Turn the heat to medium, let the pan heat up again. Add the eggs, stirring in a quick motion to break up and scramble the eggs. When the eggs are almost cooked through (they should still be slightly runny in the middle), dish out of the pan into the same plate as the cooked shrimp.

4. Use paper towels to wipe the same wok or sauté pan clean and return to high heat with the remaining 1 tablespoon of cooking oil, swirling to coat. When the oil is very hot, add the green onions and fry until fragrant, about 15 seconds. Add in the rice and stir well to mix in the green onions throughout. Spread the rice all around the wok surface area and let the rice heat up, untouched until you hear the bottoms of the grains sizzle, about 1-2 minutes. Use the spatula to toss the rice, again spreading the rice out over the surface of wok.

5. Drizzle the soy sauce all around the rice and toss. Add the peas and carrots, the cooked eggs, shrimp and sesame oil, tossing to mix the rice evenly with all of the ingredients. Let everything heat back up again, until the rice grains are so hot they practically dance! Taste and add an additional 1 teaspoon of soy sauce if needed.

Tuesday, June 29, 2010

The beauty of a culinary pas de deux - Asparagus with Soft-Cooked Eggs


Ingredients:
1/2 pound Asparagus, tough ends removed
2 tbs olive oil
2 eggs
salt, pepper
2 ounces creamy garlic and herb cheese (such as Boursin) or neufchâtel (light cream) cheese, cut into 1/2-inch pieces or 2 ounces grated parmesan cheese(optional)

Directions:
1. Cook asparagus in medium skillet of boiling water until just tender, about 3 minutes. Drain.
2. Heat oil in heavy large skillet over medium heat. Return asparagus to skillet, stir over medium heat.
3. Add eggs; (and cheese) stir (cheese melts, if using) and gently cook them until just before they're set, remove from heat and let the heat in the pan finish cooking them about 2 minutes.
4.No further adornment required, serve with fresh chives and whole grain bread, and let the flavors dance together!

Monday, June 28, 2010

Easy Zucchini Tart


Ingredients:
1 sheet frozen puff pastry, defrosted according to manufacturer's directions
6 ounces low fat ricotta cheese, drained of any excess liquid in a fine sieve
1 medium zucchini
1 tablespoon olive oil
2 large eggs
1/2 teaspoon freshly ground black pepper
1/3 cup fresh dill
Flour, for work surface
Salt and pepper

Directions

1.Preheat oven to 400 degrees. On a lightly floured work surface, roll the puff pastry into a 9-inch pie dish.

2. Using a large wooden spoon, combine the eggs, ricotta, black pepper and fresh dill. Spread the ricotta filling evenly over the pastry base, leaving a 1-inch border.

3. Press the Zucchini slices and arrange in a single layer over the cheese spread. Spray with olive oil. You can brush the edges of the puff pastry with egg yolk to have a nice golden color (optional)

4. Bake until zucchinis are tender, 20 to 25 minutes. Slice and serve warm!

Asparagus Tart


Yes Puff Pastry! But everybody has one (or more?) guilty pleasure food...and puff pastry is one of mine. We have this love and hate relationship. I love the comfort and the texture of the puff pastry but hate the fact that it is made of butter! Growing up my mom always had puff pastry in the freezer, for quick afternoon tea treats. I usually don't buy it, you know what they say " out of sight - out of mind!" and it is really true! I was doing my grocery shopping before my knee surgery and couldn't resist buying a pack of puff pastry since it is very easy and quick to prepare a meal with it ( or at least how I justified it, anyway).

As you can see it is hard to resist if your pleasure factor is waiting for you right in your freezer. I still tried to make this recipe lower calorie and substituted the Gruyere cheese with low fat ricotta cheese.  All I could say it was easy, fast and tasty!

Ingredients:
1 sheet frozen puff pastry, defrosted according to manufacturer's directions
6 ounces low fat ricotta cheese, drained of any excess liquid in a fine sieve
 or 5 1/2 ounces (2 cups) Gruyere cheese, shredded
1 1/2 pounds medium or thick asparagus
1 tablespoon olive oil
2 large eggs
1/2 teaspoon freshly ground black pepper
1/4 tsp freshly ground nutmeg
Flour, for work surface
Salt and pepper


Directions

1.Preheat oven to 400 degrees. On a lightly floured work surface, roll the puff pastry into a 16-by-10-inch rectangle. 

2. Using a large wooden spoon, combine the eggs, ricotta, black pepper and the nutmeg. Spread the ricotta filling evenly over the pastry base, leaving a 1-inch border.

3. Trim the bottoms of the asparagus spears to fit crosswise inside the tart shell; arrange in a single layer over the cheese spread. Spray with olive oil. You can brush the edges of the puff pastry with egg yolk to have a nice golden color (optional)

4. Bake until spears are tender, 20 to 25 minutes. Slice and serve warm!

Sunday, June 27, 2010

Bulgur Pilaf with Garden Fresh Tomatoes and Peppers


This recipe combines Bulgur's wonderful nutty flavor and light texture with fresh tomatoes and peppers. And gives you a soul-satisfying yet very healthy summer time meal.  

Ingredients:
1 cup coarse bulgur
2 tablespoons olive or canola oil
1 medium onion, petite diced
2 tomatoes,petite diced
2 banana peppers, pablono or any fresh pepper, diced
1 tablespoon tomato paste
1 1/2 cup water
Salt, pepper to taste


Directions:

1. Heat the oil over medium-high heat. Add onions and saute, stirring occasionally, until translucent then  add peppers and stir until soft.
2. Add tomato paste and stir for a minute and add tomatoes when tomatoes are cooked add bulgur, salt and water; stir to combine.
3. Cook covered until most of the liquid is absorbed.  Keep simmering on low heat until liquid has evaporated and bulgur is tender, for about 15 minutes. Remove from heat and place a paper towel between the pot and the cover and let it seat for 10 min. before serving.

This recipe is my first submission to Blogger Secret Ingredient event, featuring bulgur, hosted by Healthy Exposures.

Saturday, June 26, 2010

Soba Noodles with Peanut Sauce


Soba noodles are native Japanese noodles made of buckwheat flour. They are so good especially in the summer.

A quick note about the health benefits: Soba contains all eight essential amino acids, including lysine, which is lacking in wheat. It also contains a type of polysaccharide that is easily digested. Soba noodles also contain antioxidants, including rutin and quercetin, and essential nutrients including choline, thiamine and riboflavin. (reference for health benefits: WikiPedia)

Ingredients:

4 oz soba noodles
1/2 c creamy reduced-sodium natural peanut butter
3 Tbsp reduced-sodium soy sauce
2  Tbs white miso paste (optional)
3 Tbsp rice wine vinegar
1/2 Tbsp toasted sesame oil
2 tsp chile paste with garlic (optional),
1 tsp sesame seeds, toasted
4 oz light firm tofu, drained, patted dry, and cut in 1/2" cubes
2 c shredded or grated carrots (about 2 lg)
3 scallions, thinly sliced (optional)

Directions:

1. Prepare noodles per package directions. Place peanut butter in small microwaveable bowl and microwave on high 15 seconds to soften.

2. Whisk together peanut butter,  miso paste (if using), soy sauce, vinegar, oil, chile paste (if using), and sesame seeds in large bowl while noodles cook. Set aside.

3. Heat medium skillet coated with cooking spray over medium heat. Add tofu and sauté until lightly browned, about 5 minutes.

4. Drain pasta and add to peanut sauce along with all but 1/2 cup of the carrots. Mix until well combined. Top with tofu and remaining carrots and sprinkle with scallions. Serve immediately or chill and serve cold.

Friday, June 25, 2010

Strawberry Muffins


Ingredients:
1 1/4 cup White whole wheat flour
1 1/4 tsp baking powder
1/2 tsp salt (optional)
1 egg
1/2 cup turbinado sugar + 2 tbs agave nectar
1/3 cup canola oil
1/2 cup 1 % milk
1 tsp vanilla extract
1 cup sliced strawberries
1/3 cup sliced almonds


Directions:
1. Preheat oven to 400F and grease 12 cup muffin pan
3. Whisk flour, baking powder, and salt together in a large bowl.
4. Whisk sugar, agave nectar and eggs together until thick and homogeneous, about 45 seconds. Slowly whisk in oil and milk until combined. Add the vanilla extract.
5. Using rubber spatula, fold egg mixture and flour mixture until just moistened, do not overmix.Fold in sliced strawberries.
6. Divide batter evenly among prepared muffin pan and sprinkle almonds on top of muffins
8. Bake until muffin tops are golden and just firm, 15-20 minutes, rotating muffin tin from front to back halfway through baking time. Cool muffins in muffin tin for 5 minutes, then transfer to wire rack and cool 5 minutes before serving.

Thursday, June 24, 2010

Asparagus Quiche with Brown Rice Crust


Ingredients:
2 cups cooked brown rice (3/4 cup uncooked)
1/2 pound asparagus (cut into 1-inch long pieces and steamed)
1 small or 1/2 medium yellow summer squash, cut lenghtwise
1/4 cup tablespoons shredded cheddar or gruyere cheese
2 medium garlic cloves, minced
1 cup fat-free evaporated milk
2 eggs
1/4 teaspoon salt
1 tsp pepper
1 tsp paprika
1/4 tsp nutmeg
* Serves 6 


Directions:
1. In a small saucepan, cook the rice using the package directions, omitting the salt and margarine.
2. When the rice is almost done, preheat the oven to 450°F. Lightly spray a medium skillet and a 9-inch quiche dish or pie pan with cooking spray.
3. Saute the squash, asparagus, and garlic in the skillet over medium-low heat for 3-4 minutes, or until crisp-tender, stirring occasionally. Set aside.
4.  In a medium bowl, stir together the cooked rice, eggs, salt, pepper paprika and nutmeg. Press the mixture over the bottom and up the side of the quiche dish. Bake for 5 minutes. Transfer to a cooling rack. Reduce the oven temperature to 325°F.
5. In a medium bowl, stir together the milk, and the asparagus, squash. Pour into the hot rice crust. Sprinkle with the cheese. Bake for 35 to 40 minutes, or until a knife inserted near the center comes out clean. Transfer to a cooling rack and let stand for 10 minutes before serving.

Wednesday, June 23, 2010

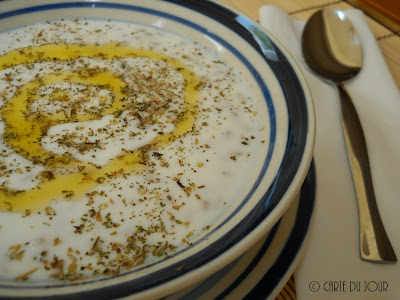
Chilled Yogurt Wheat Berry Soup (Soguk Yogurt Corbasi)


Wheat berry, is not a berry at all, but it refers to the entire wheat kernel. They retain all their original goodness, including B vitamins, antioxidants, and fiber. I usually double the amount of the berries and freeze the half for the second time because I can never have enough of this soup.
 
Wheat berries are so versatile you can also use these berries for a delicious salad with a crunchy texture, or even for a fiber packed breakfast! Just add some cranberries, raisins and nuts (pecans, walnuts, or hazelnuts) with a drizzle of honey or maple syrup or maple-yogurt combination and voilà! you won't go back to your instant oatmeal again. It is chewy, nuty and so versatile...go ahead and give these humble berries a chance they won't dissappoint you whether with a sweet combination or savory!

Ingredients:
1 cup soft wheat berries
1/2 cup dry chickpeas or 1 cup canned, drained and rinsed (optional)
1 (32 oz) plain non fat yogurt, (strained yogurt is the best for this recipe)
1 tsp dried-mint flakes or finely chopped fresh mint
1 tsp dried oregano (optional)
1 tsp red pepper flakes (optional)
olive oil (garnish)
salt


Directions:

1. Soak berries (and chickpeas if you are using) overnight, keep in the refrigerator to avoid fermentation. You will need 3 cups of water for 1 cup of berries.
2. In a large pot over medium-high heat. Bring berries to a boil, lower the heat, and simmer, covered, until plump and chewy (and a few of the berries split open), about 30 min. (it takes about an hour or longer if you skipped the first step and didn't soak them overnight). The berries will  be chewy, taste a few to make sure they are cooked. Drain and set aside. (If you are using chickpeas, cook the chickpeas with the berries, if you are using canned version add them 10 min. after you add the berries)
3. Let the berries cool.
4. Add the yogurt and stir to combine.
5. Sprinkle dried mint flakes and serve with a drizzle of olive oil and savor every bit of it!

Tuesday, June 22, 2010

Chickpea Curry (Channa Masala or Chole)


I love this recipe because it is very easy to make, I always try to have my ingredients at hand so I can prep a healthy and nutritious meal in no time. A well stocked pantry is your biggest tool for saving yourself from saturated fat and sodium loaded restaurant meals which will in turn allow you to spend the money you save on healthy and wholesome ingredients. For chickpeas I always try to use dry chickpeas soak the entire package overnight and freeze them so I can have extra for the next time and I just thaw them overnight in the refrigerator. It takes more time but canned chickpeas have more sodium whereas there is virtually no added sodium with the dry version, but it is still ok to use them, I still have couple of them in my pantry just in case if I am in a hurry. Just make sure to drain and rinse well if you are using canned version. 

Just a quick note about the health benefits: If you're wondering how to replace red meat in your menus, become a fan of chickpeas also known as garbanzo beans. When combined with whole grains such as rice, garbanzos provide virtually fat-free high quality protein. In addition to providing slow burning complex carbohydrates, garbanzos can increase your energy by helping to replenish your iron stores.

Ingredients:
1 cup dry chickpeas or 2 (14 oz) canned chickpeas, drained and rinsed
1 (16 oz) canned tomatoes, petite diced
1 tbs mild red pepper paste (optional)
2 tbsp canola oil
1 onion, petite diced
3 garlic cloves, minced
1 tsp mustard seed
1 dried chili, or 1/2 tsp chili flakes
1 tsp cumin
1 tsp turmeric
1 tsp paprika
1 tbsp of ground coriander
2 tbsp curry powder
1 tbsp salt, or to taste
1 tbsp chopped cilantro for garnish (optional)

Directions:

1. Heat oil in a large pot and add onions and garlic and cook until translucent, about 5 minutes.

2. If using red pepper paste add the paste and stir for 2-3 min. and then add the tomatoes and all of the spices and stir to combine. Add the chickpeas and cook, stirring occasionally for about 30-35 minutes. Serve with bread or basmati rice. Add cilantro for garnish if using.

This recipe is my third submission for this month's My Legume Love Affair, one of my favorite events brought by Susan from the Well Seasoned Cook and hosted by A Little Bit of Spain in Iowa

Sunday, June 20, 2010

South of the Border Cravings and My Cuban Inspired Black Bean Chili


Well, most people associate chili with cold winter nights, not me! I can have my chili any time of the year regardless of the weather, no matter how hot it is! It is not only a delicious meal but also very nutritious. I love to eat and cook chili so much I don't even look for recipes, this is my latest invention I hope you enjoy it as much as I do. It has a spicy kick to it,  adjust the seasonings and use less, if you like yours mild.  

Ingredients:
1 cup dry black beans or 2 (14 oz) canned, drained and rinsed
1lb chicken breast, cubed
1 (16 oz) canned tomatoes, petite diced
2 ts Serrano peppers; chopped
3 cloves of garlic, minced
1 large onion, diced
1/2 cup grilled corn, removed from cob
2 tablespoons canola oil
1 tablespoon chili powder
1 1/2 teaspoons ground jalapeno
1 teaspoon hot paprika
1 teaspoon chipotle chile powder
1 teaspoon cayenne chile powder
1 tbspoon cumin (you can use less if you like)
juice of 1/2 lime
pinch salt
Directions:

1. If you are using dry beans soak them overnight. If you are using canned beans drain and rinse well.
2. Heat the oil in a pot and saute the onion until translucent. Add the garlic and stir for 2 min. until fragrant.then remove the onion and garlic from the pan and set aside
3. Add the chicken and saute until slightly brown. Add the peppers and saute until soft, add the onions back.Add the beans and cook for 3-4 min. stirring occasionally.  Add the tomatoes, corn, lime juice and spices and stir to combine. 
4. Reduce heat to low and simmer for about 25-35 minutes. Uncover and simmer for an additional 20 minutes or until the liquid has reduced

This recipe my second submission for this month's My Legume Love Affair, one of my favorite events brought by Susan from the Well Seasoned Cook and hosted by A Little Bit of Spain in Iowa


Saturday, June 19, 2010

Soup for the Soul - Paula's Chicken Noodle Soup


There are people who come into our lives, and you just can't help but wonder, are they real or did God send one of His angels down to earth just to help me?  Paula is one these people, she is just naturally selfless. On May 18th, I had a knee surgery and was feeling very grumpy afterwards, I guess it was more because of not being able to move as much. My poor husband should be a saint for putting up with me. During that time what really lifted up my spirits most was Paula's soothing Chicken Noodle Soup! it had a more calming effect on me than all the strong pain killers I was on. Not just her delicious soup but she also send me her decadent mint frosted brownies and famous zucchini bread that my daughter loves so much. I really tried so hard no to finish all of the brownies before our little one comes from school!  

Did I tell you she was my daughter's preschool teacher? and she bakes for her students snack time, she acts like she is doing nothing extraordinary but others around her know what special person she is. We need teachers like Paula for our children, we need people who are there when you needed it most, we need to be more like Paula.


I will post the recipe as soon as I get my hands on it!

Artichokes with Fava Bean Purée (Favali Zeytinyagli Enginar)


The magic beans that grew overnight into a beanstalk that reached into the clouds could be fava beans. Fava Beans or Broad Beans (actually a member of the pea family) are among the world's oldest cultivated beans.You might consider making these under-appreciated beans a more frequent addition to your diet, especially if you are seeking more fiber in your diet.

Fava beans are especially high in fiber (85% of the RDV), and also high in iron (30% of a day's requirement), and very low in sodium. Additionally, they contain no cholesterol and are low in fat. While the nutrition and health benefits of fava beans are quite impressive, they are also countered by the fact that favas do contain 50 grams of total carbohydrates and almost 300 calories per 3/4 cup serving. Fava beans are also noted to contain L-dopa, which is used as a drug for the treatment of Parkinson's disease. Additionally, as with most whole grains, consumption of fava beans can help reduce risks associated with heart disease.

Not convinced yet? their buttery texture and nutty taste makes it worth time consuming prep time! It is actually fun too, I shelled them together with my five year old daughter! A real playdate for both of us!

Ingredients
1 lb peeled artichoke bottoms (7-8 pieces) or 1 lb frozen or 2 canned artichoke bottoms
1 lb fresh or frozen fava beans, shelled
1 onion, petite diced
2 tbsp dried mint flakes or 1/2 bunch fresh mint leaves, finely chopped
juice of 2 lemons
1/3 cup olive oil
1 bunch dill, chopped
1  1/2 tbsp sugar
salt

Directions:
1. Heat 2 tbs olive oil in a pan. Stir in onion, saute until translucent.
2. Add fava beans, mint, and half of dill. Stir for 3-4 minutes. Seal the pot with aluminum foil and place the lid. Cook on medium for 30 minutes or until beans are cooked. When they are cooked mash the beans and let them cool.
3.In a separate broad pot,  Add lemon juice, sugar, and hot water. Place artichokes in the pot: pointy sides facing up. Cook for 20 -25 min until artichokes are tender. Once you turn it off, sprinkle salt. Let artichokes cool in the pot.
4. When they're not hot anymore place artichokes on a serving plate and stuff them with fava bean puree.
5.Garnish with dill on top.

* Optional: You can also add one medium carrot to fava bean puree, if you like.
This recipe my first submission for this month's My Legume Love Affair, one of my favorite events brought by Susan from the Well Seasoned Cook and hosted by A Little Bit of Spain in Iowa

Friday, June 18, 2010

Malaysian Chicken Curry in Coconut Milk


Ingredients
1 lb chicken breast, cubed
1 clove garlic, minced
1 tablespoon canalo oil
1 teaspoon minced fresh ginger
1 tbsp. chili powder
2 tbsp. curry powder
1 tbsp. paprika
1 tsp. cumin
1 (16 ounce) can diced tomatoes
1 (14 ounce) can low fat coconut milk
1 teaspoon salt
1 lb. potatoes, peeled and cut into chunks

 
Directions:
1. Heat the oil in a pot and saute the onion until translucent, add the garlic, saute for another 1 minute and set aside.
2. Add the chicken and continue cooking for 5 minutes and then add the onion and all the spices and stir.
3.Add the potatoes. Let cook until chicken and potatoes are tender. Add the remaining ingredients. Stir coconut milk well before adding.
4. Serve over Jasmine rice and enjoy!

Saturday, June 5, 2010

Tuesday, June 1, 2010

Coconut-Almond Crusted Mahi Mahi


My initial intention was to prepare a macadamia nut crusted mahi mahi but my husband and macadamia nuts cannot co-exist in the same environment! Therefore, I had to find another way so I decided on almonds. Then I searched for the right recipe, and none of the recipes did sound appealing to me. So I came up with my own recipe and to my surprise the pickiest member of our family, my five year old daugher asked for more!

Ingredients:
4 mahi mahi fillets
1/2 cup low fat coconut milk
1/2 cup chopped almonds
1/3 cup cornmeal
1 tbs fresh ginger
4 lemon wedges for serving
salt, pepper

Directions:

1. Place mahi mahi fillets in a large container and cover with coconut milk, marinate for 30 min to 1 hour.
2. Preheat the oven to 425F.
3. In a food processor combine almonds, cornmeal, fresh ginger and salt and peppermix until combined
4. Lightly oil a wire rack large enough to hold fillets in a single layer. Place the rack on a baking sheet and set aside.
5. Divide the nut mixture among the tops of the fillets, patting the mixture to spread and adhere to the fillets.spray tops with olive oil
6. Set on the prepared rack; they should not touch. Bake until lightly browned on the outside and opaque in the center, about 15 min. Serve hot.

Celeriac and Sweet Potatoes in Olive Oil? Refreshing!


This is my diversified version of a classic Turkish olive oil dish, celery root in olive oil. Although it is best in the fall and can be found all winter, I can't resist buying celeriac even when it is out of season. Since all Turkish olive oil dishes are served cold, they are great for summer, and this dish is no exception. It is very light, and tasty. The classic version of this dish does not include sweet potatoes. I wasn't sure what to expect but the end result turned out much better than I hoped! Tanginess of fresh orange juice and peas with the sweetness of carrots and potatoes combined with nuttiness of the celeriac just one word refreshing! 


Ingredients:
1 medium size celery root (Usually, a 1 pound celeriac will yield about two cups once peeled and sliced or grated)
1 pound frozen mixed peas and carrots ( or 1/2 pound green peas and 2 medium carrots, petite diced)
1 big onion, diced
1 large sweet potato, peeled
1 potato, peeled
1 cup orange juice (try to use fresh if you can)
Juice of a half lemon
1/3 cup extra virgin olive oil
1 1/2 tbsp sugar
salt
1 bunch dill, chopped
1 cup water
Serves 6

Directions:
1. Brush the celeriac under cold water, since it may still have bits of soil stuck between the roots.
2. Peel and cut the celery root in half inch rounds and place immediately in a bowl of iced water with the lemon juice added since the peeled celery root darkens pretty fast.
3. Cut the potato and sweet potato in half inch rounds, set aside.
4. Heat  two tbs oil in a pan and saute the onion until translucent for about 3 min. Remove the onion.
5. In a broad pot heat the rest of the olive oil and place the celeriac and potato rounds.Put the onions on top.
6.Add peas and carrots, sugar, salt, orange juice, 1 cup water and cook on a low heat for 30-35 minutes.
7.Let cool in the pot with the lid on. Garnish with fresh dill and enjoy!